Saturday, September 11, 2010

How to make Elderberry Syrup

I thought I would post this tutorial on how to make elderberry syrup. I've had several people ask me what i give my kids during cold and flu season since I don't reach for the traditional Robitussin or Triaminic. Elderberries are a wonderful herb used in natural cold and flu remedies. Tea can also be made from dry elderberries as well. This recipe is by Mountain Rose Herbs. You can watch a full tutorial here for more details. In this recipe I use dry berries, but frozen or fresh can be used too. It's a very simple recipe. Here's what you'll need:

1/2 cup of dried elderberries (fresh or frozen can be used, just increase to 1 cup)
1 cinnamon stick
5 cloves
1tbsp fresh grated ginger
2 cups water
1 cup of honey


Step one: Combine elderberries, cinnamon stick, ginger, cloves and water in a saucepan .


Bring to a boil


Once boiled, simmer covered until liquid is reduced by 1/2 (approximately 20-30 minutes)


Next, pour through a sieve into a bowl or large measuring cup.


Use a spoon to push excess liquid out of berries into the bowl


Add 1 cup of honey, stir and let cool.


Store in a closed jar in the refrigerator for up to one month.

This syrup can be taken 1 tbsp every couple of hours while sick, or as a preventative during cold and flu season, take on 1 tbsp a day. It tastes yummy. The kids love it. This syrup contains honey. Avoid giving this to any child under one year of age. Pure maple syrup can be substituted for those under one year of age.


Monday, May 17, 2010

On a Mission!


We had an amazing time on our mini vacation! Justin was able to get a couple of weeks off of work so we decided on the San Diego Zoo and Wild Animal Park. The kids loved it!!!

Milla's favorite was the Pink Flamingo of course because it was pink!! She also enjoyed all of the monkeys. I think because she is one at heart!


Ian will probably hate me for this one. I took his picture on this same turtle when he was Milla's age! So I made him get on it again! He was kinda mad, but he caved to make me happy. LOL


We decided to stay another night, so we drove over to San Juan Capistrano to see the mission. Ian is doing his 4th grade mission project on this so we thought it would be a great learning experience! The photo below shows 4 bells. These bells were rung when someone died.


Milla even got her own audio tour for kids!!


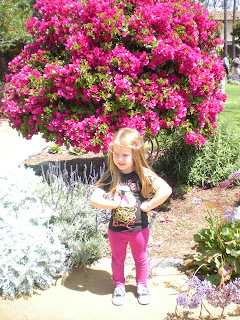
These pictures do not do justice for how beautiful it was that day! Everything in the gardens was in full bloom. Milla wanted a picture by the pink flower tree....of course!


Panning for gold was the highlight for the kids. Milla thought she was the richest person ever!

We had an amazing time. It was nice to have this time as a family and share these experiences. My parents did this for us when I was young and I instantly fell in love with the California Missions. San Juan Capistrano being my favorite!

Saturday, April 3, 2010

Our Egg Dying Eggstravaganza!


So, I thought I'd post this since every one's been asking. This year, I decided that we would find a natural method to dying our Easter eggs. I got the idea from another blog, Crunchy Domestic Goddess. We had so much fun experimenting with different foods to come up with colors. Here's a summary of what we did. You can visit the above blog for the full tutorial. Yes, it was a bit more pricey than the .99 cent Paas box, but it was a fun experiment for the kids. Plus, my husband and son like to call me a modern day hippie, so I thought I'd live up to the name. I really wanted to go with a more earthy color theme so I was very impressed with the results The above picture shows the ingredients and materials we used to make the dye. We used, purple cabbage, spinach leaves, frozen blueberries, frozen cherries, canned beets, coffee, tumeric powder, chili powder, vinegar and rubber bands and crayons for decorating. The crayons are the little colored pebbles in the pouch. There's also a red onion pictured, but we didn't end up using it. I wish we would have though because our red dye turned our eggs a dark bluish gray.


We used spinach leaves, blueberries and some tumeric powder to make green. This green turned out beautifully!! We didn't do too much measuring aside from the vinegar. We just kept throwing stuff in. It's important with the fruit especially to warm it and mash it up. When the berries burst, then all the color is released.


Next we used the purple cabbage and blueberries. This made an amazing dark blue!!!


This is the red dye....well..what was supposed to be red anyway. I used 2 cans of beets, (next time I'll try 3), frozen cherries, and not pictured above, some ocean spray cran-cherry juice. I think the juice is where we went wrong. Next time I'll use the red onion instead. These eggs still turned out a cool color though.


This is the yellow...obvioulsy...We used tumeric powder at first, then we decided to add chili powder to the mix and it mad a more vibrant yellow. Also, not pictured, we used coffee for the brown. I just brewed a REALLY strong pot of coffee and let the eggs sit overnight. I actually strained all of the dyes and set the eggs overnight in the liquids. This part is definitely crucial if you want the most vibrant color.


Our beautiful eggs!!!! We loved them so much. Milla especially likes to smell the brown ones because they smell like french vanilla coffee!!! LOL All in all we had fun. It was our first attempt. We learned a few things and we'll tweak some things next time. Thanks for looking at our masterpiece! LOL